Understanding The Science: Shot Quality Challenge
Challenging - that is what describes the Shot Quality challenge (both for players as well as the developers!). Mingle has been working on the Shot Quality challenge for the last two years, and is now bringing it to your mobile phone. In this article we take a look behind the scenes of the Shot Quality Challenge, and elaborate on some of the issues we’ve had to overcome.
Shot Quality Challenge
The Shot Quality Challenge is a mini-game that test players’ shooting power and accuracy. The challenge is done without a goalkeeper and aims to improve players’ shooting skills over time. Each shot is recorded with a mobile phone using a single camera and can be replayed afterwards. After you take a penalty, Mingle Magic is applied to calculate your power and speed. We also enhance the video with various techniques to improve the look of your shot.
Below is an example of the challenge:
But how do we get to these eventual 15 seconds of footage? We won’t go into the entire development process - you’d be here forever - but we’ll take a look at our current solution.
Consistency
If we’d have to answer the question what makes the Shot Quality challenge so challenging, it would be consistency. No user wants to use a mini-game that fails a lot! Is our mini-game perfect? No, of course it isn’t - but it comes very close. So what do we mean with consistency in this case then?
The challenge consist of multiple machine learning steps, algorithms and calculations. If any of these steps fails, the result can no longer be calculated. To give an example: if the ball isn’t recognised on some frames, we can still use interpolation to solve it. If it’s too much however, we’re unable to calculate the trajectory and the Shot Quality challenge will fail.
Development
This part will describe the development of the Shot Quality challenge.
How does it work?
Currently the Shot Quality challenge consists of multiple steps - we’ll go through them individually:
Object Detection and Optimisation
Object Tracking
Metadata (Camera Matrix and Distortion Coefficients)
Shot Quality Algorithm
Selecting correct ball tracklet
Physics model
Choosing the best path
Shot Quality Video Generation
Object detection and Optimisation
YoloV5
We’ve gone through a lot of iterations trying to find the optimal object detection model and best settings. This is an ongoing process that constantly keeps evolving.
After many iterations we’ve come to the conclusion that the biggest influence on the results is primarily the amount of data. You can manipulate data by making changes to colours, size, reflections, cropping and many more. None of these however have as much influence as adding more specific data.
To give an example, one of the challenging parts we are facing right now is night-time Shot Quality shots. The best solution to this problem thus far - ironically enough - has simply been adding more data of night-time penalty shots.
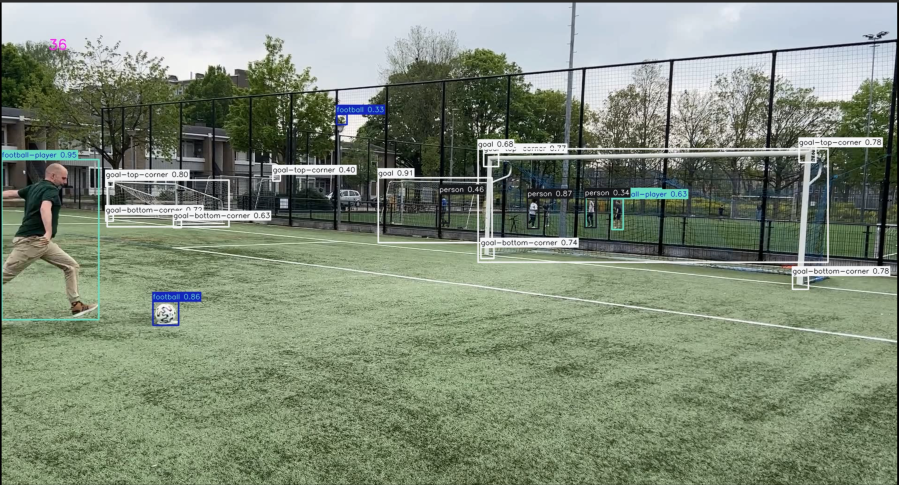
Below shows an example of the object detection of our penalty challenge.

In this example we can already identify some problems:
a football is being detected in the trees
multiple goals are in sight
Both of these can cause significant problems with the tracker. As humans, it is obvious to us where the ball is and what goal we’re aiming at.
For computers however, this task is more complicated which means we have to make all sorts of assumptions. It might therefore be possible that we actually select the wrong goal, leading to a bad result for the Shot Quality challenge.
Object Tracking
Mingle Tracker v2.0
Once the objects are detected the next step is to track them over time. Again - this seems simple, but is actually quite challenging due to the amount of edge cases. It is quite common that people have multiple balls in the video, causing the object tracker to fail or select the wrong ball with the tracker. In that situation the Shot Quality completely fails because it has the wrong trajectory.
We’ve drastically decreased this issue with the two following rules: setting the confidence threshold of the object detection really high (75% in our case), and not allowing users to have multiple footballs in the video. Sometimes the best solution is prevention.
We don’t use a pre-built object tracker. We’ve tested multiple trackers for our problem but none of them were able to solve our problem. Therefore, we’ve written one ourselves which performs really well on these videos (but that’s for a different article).
Metadata (Camera Matrix and Distortion Coefficients)
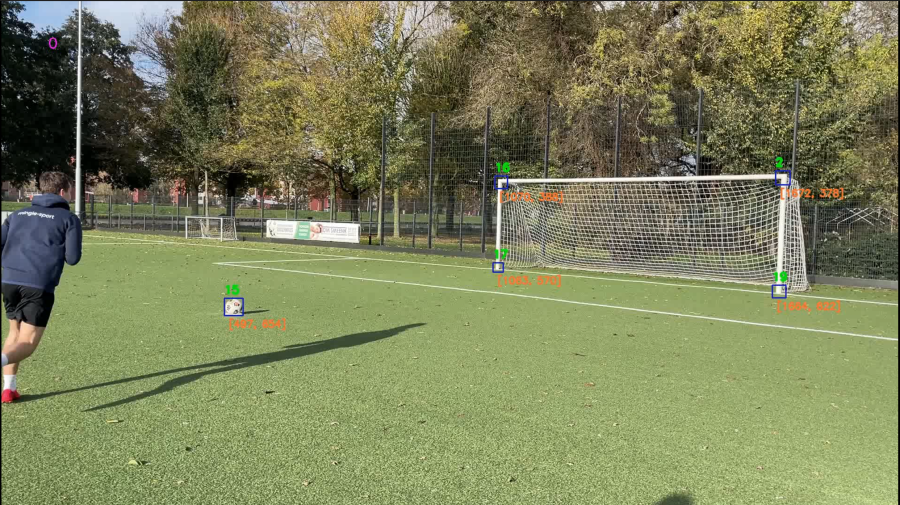
The Shot Quality Algorithm requires some important variables/matrices such as the Camera Matrix and the Distortion Coefficients. With these values we are able to calculate a 3D representation of the field.
With the DLT algorithm you are able to calculate the camera position, rotation, translation and thus the actual position of the camera and thus we can determine the pixel position in the frame from any given 3D position.

The Camera Matrix and Distortion coefficients are used to calculate 3D points back to a 2D pixel position. But also gives the option to calculate a 3D position where Z is known from a 2D pixel location. Below shows the formula, where the first matrix represents the Camera Matrix. Fx, Fy is the focal point and Cx, Cy represents the Principal point depending on the camera lens.

The third matrix represents the rotation and translation of the scene. Combining these first 3 matrices calculates the X, Y, Z position in 3D. With this calculations we are able to determine if the trajectory of the penalty shot is realistic in comparison to one of our physics paths. This brings us to the main algorithm calculating the result.
The Shot Quality Algorithm
This is where the magic happens: the Mingle Shot Quality Algorithm. This algorithm also goes through multiple steps that we will highlight:
Selecting the correct tracklet
Physics model
Matching of tracklet to all physics paths
Selecting the best path
Selecting the correct tracklet
Before we can even calculate anything we first have to determine which tracklet (a tracklet is a tracked object over time with its own ID) is the correct ball tracklet and fix mistakes if they are there. With the Mingle tracker we are able to go through all football tracklets and select the correct one. This step usually goes quite well since we only have one football in the screen.
There are situations however where this doesn’t work perfectly due to occlusion. If a player stands in front of the ball with his/her foot we cannot detect the ball. We therefore have to adjust the tracker in such a way so the interpolation between the occluded frames goes smoothly.
There are also frames where the ball cannot be seen (e.g. when it is behind the goal post). Finally, the ball is sometimes not detected properly due to the background (e.g. if the ball is in the same position as the goal post). All these things need to be adjusted in this step and solved.
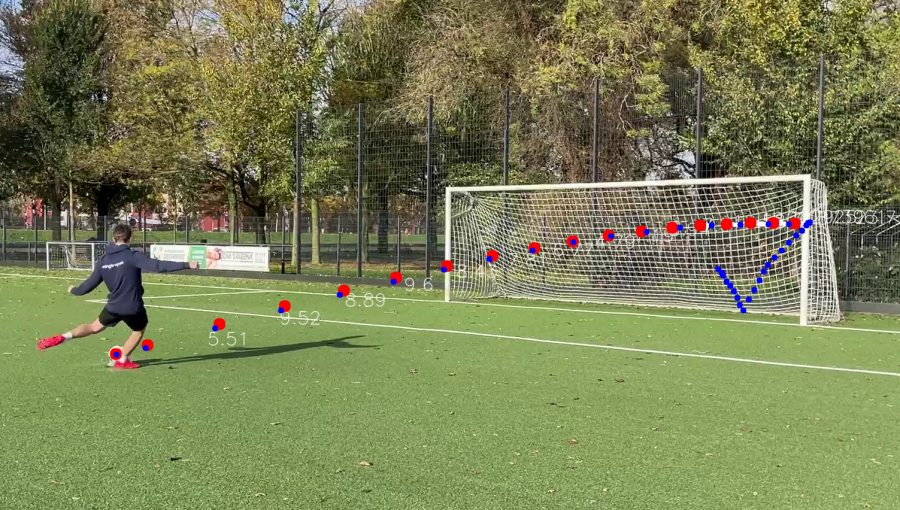
The blue dots represent the actual trajectory of the shot, while the red dot represents the best physics path that comes close to the actual path.
Physics Model
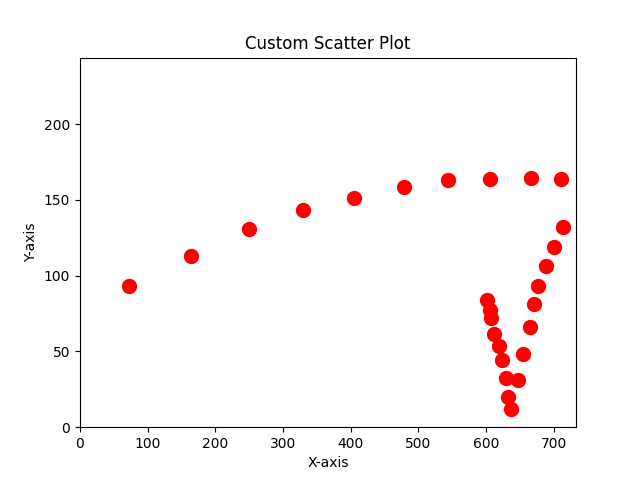
How can we estimate the 3D trajectory of the shot? We match a physics model back to 2D pixel positions. First we calculate a lot (and I mean a lot) of paths, and then take a subset of these matching them on all possible ending positions when looking at the 2D positions within the goal. The image below depicts all possible trajectories that we allow to stand as a goal.
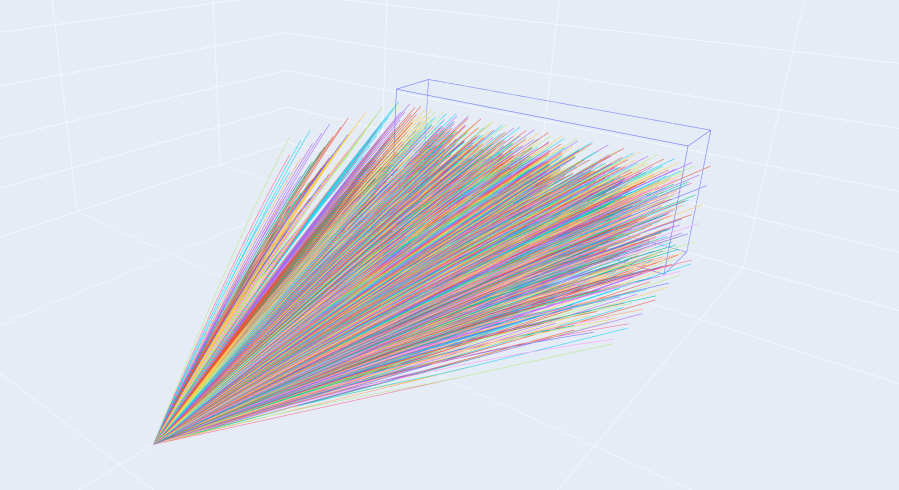
We then determine all pixel positions of the ball where it was within the goal. Then we remove all physics path that don’t have an ending position within the range of the red dots.
The image below shows the values between x 0 → 733 and y 0 → 244 (Since a goal is 733x244 cm).
Matching of tracklet to all physics paths
Once all paths are generated for the selected 2D positions within the goal we can start matching them. We then select the path that comes closest to the actual trajectory by mapping it back to 2D positions. We take into account the amount of frames needed to end up in that position, because otherwise always the shortest path would win.
The video below depicts an example of all the possible paths that we’ve found + the end path that we selected as a winner.
Calculating the score
Now that we know the end position and frame number, we can calculate the actual score.
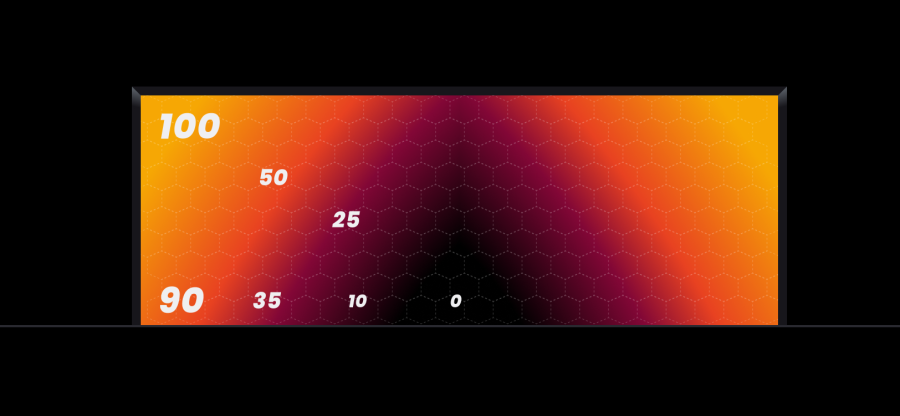
This is done by adding the speed on top of the SQ goal score. The image below shows a gradient with scores centred around the bottom middle. This means that the bottom middle gives you a score for accuracy of 0 while the top-right / top-left gives you 100 points.
As an example, let’s say that the speed is 50 and you strike the ball perfectly in the top-left corner (100). Since it’s a challenge measured by speed and accuracy, your total score would be 50 (speed) + 100 (accuracy) = 150.
What’s next?
We’re constantly improving The Shot Quality challenge and are working hard to create the best possible experience. Every percentage gain is a challenge, but totally worth it! We want to give the user an optimal experience when playing this mini-game and have the fail percentage as low as possible.
But most importantly, we want users to enjoy our mini-games and improve their shooting skills.
Shot Quality is currently in beta, but will be available in the app soon for iOS users.


